

Written by Teodor Iliev
2,902 followers
Updated

Reviewed by Adam Crookes
In this guide, we'll walk you through the process of adding a custom domain to your Framer website. Custom domains provide a professional touch to your site and make it easier for visitors to find you. Let's get started!
Configuring Your Domain
By default, Framer preview links use the format https://*.framer.app. However, you can set up a custom or free .framer domain by following these steps:
Go to your Framer project's Settings.
Navigate to the Domain section.
If you've previously set up a custom .framer domain (e.g., mytestsite.framer.website), you'll need to remove it first. Once removed, you can add your new domain to the custom domain field.
Setting Up a Custom Domain (e.g., yourdomain.com)
If you've purchased a custom domain through a web hosting service such as Google Domains or GoDaddy, Framer may support auto connect which will make connecting your domain super easy. Simply follow the instructions and your domain will be connected.
However, if your domain was purchased from a vendor that does not support auto connect, follow these steps to connect it to your Framer project:
Go to the Domains page in your Site Settings.
Select Connect a domain you own.
Enter your custom domain.
Replace your DNS records (find them a little lower on this article) with the Framer DNS records provided (usually found under Domain Settings > DNS Records in your domain provider's panel).
For specific instructions, refer to support articles for commonly used domain registrars like NameCheap, GoDaddy, Google Domains, Ionos 1&1, Gandi, and Cloudflare.
Gandi: Adding A Records and a CNAME
Cloudflare: Adding A Records and a CNAME
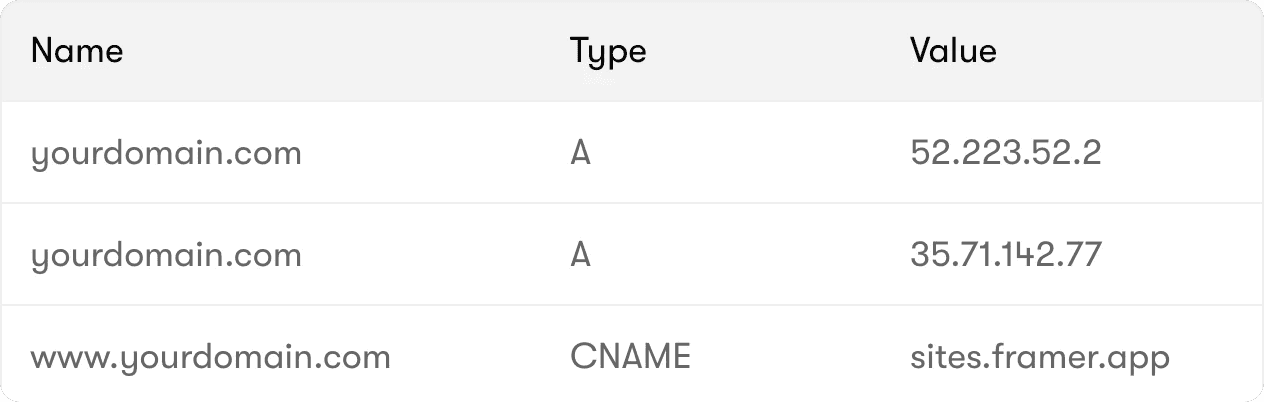
Framer DNS records
To configure a 'naked' or 'apex' domain, go to your domain's DNS settings in your domain hosting provider, and create two A records and one CNAME (for the redirect) with the following values:
For Custom Subdomains (e.g., subdomain.yourdomain.com)
To configure a subdomain, simply set up a CNAME record in your DNS settings. Some DNS providers may require you to add a dot or period at the end (e.g., sites.framer.app.). The name for the CNAME record should be either the full domain or just the "subdomain" part, depending on your DNS provider.
Confirming Changes (Propagation)
After configuring your DNS records, keep in mind that it may take up to 48 hours for the changes to propagate globally and your site to become accessible via the custom domain. However, this process often completes much faster, sometimes within minutes. The Time to Live (TTL) for DNS records can vary, so be aware of the settings you choose. Some larger or less cooperative internet service providers may not respect low TTL values, so using a public DNS server like 1.1.1.1 can be a workaround.
Troubleshooting
Ensure that you've removed all other A and AAAA records that could take precedence over the ones you set up.
Double-check if your DNS provider requires a period at the end of the CNAME record for your domain.
Use tools like nslookup.io to debug your DNS settings if needed.
Dealing with Domain Conflicts
If you encounter an error indicating that your domain is already taken, it may be associated with another project. Remove the domain from that specific project and add it to the one you want to use.
By following these steps, you can successfully add a custom domain to your Framer website, enhancing its professionalism and accessibility. If you have any technical questions or require further assistance, feel free to reach out to our support team.
Written by Teodor Iliev
2,902 followers
Teodor Iliev is the founder of Wize Design and Wize Templates. He has more than 7 years of web design experience in agencies that have done work for Sony, G2 eSports, HP, NYU, and more.


Agency quality. Template price.
not sure which framer template is right for you?
Remix any hero section from any of our templates for free before deciding to purchase.
Takes less than 30 mins

© 2026 wize design. All rights reserved.